Friday, July 30, 2010

Patterns- Legs, Knees, Shins and Toes

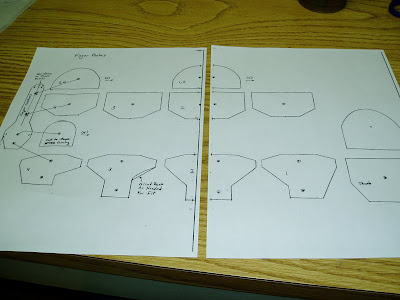
Here are the last few patterns I used for my legs, Greaves, Sabatons And Gorget.


The Legs are by Sinric, man i owe this guy big time!


The Chartes Greaves pattern is by Talbots Fine Accessories.
I had allot of trouble finding a good pattern for cased greaves, so this one i had to purchase.
I am very happy with the pattern, it came with very through instructions.
on the flip side though, i am becoming increasingly nervous about making these, as everyone on the Armour archive seem to have a very tough time making these. See my post for More info.


The Sabatons pattern is pretty straight forward. This pattern is by Mike Yancy.


NO! This is not a large pair of metal underoos. Its My gorget, or neck protection. Sickos!
This pattern is by Alan Bauldree.

The last and final pattern that i need is the mask!
I have the basic design mapped out ,as seen in my previous post. 
The only issue now is that I need to figure out how to conceal the sides of my face and forehead. 
But more on this later!

"It Looks Like a Scrap Yard in Here"

I am about 50% done cutting all of the pieces out the sheets of steel.


The newly cut steel has very sharp edges with little slivers of metal jutting from them called Burrs. 
I cant even begin to count the number of times i grabbed a lame palm first and got stabbed.
The next step will be do file down the edges so that they are smooth. Not only will this prevent 
them from cutting me but it will also prevent any further damage to my tools. 
(I did a number on the face of my largest teardrop mallet when i was shaping the shoulder cop)


The other issue i need to resolve lies in my cutting equipment. 
Because i did not have the 500 plus dollars it requires to purchase a B2 Beverly Shear, I am forced to cut the metal with my aviation snips. With a beverly shear there is a clear guide for the metal and much more power. 
With the snips the metal tends to get bent and misshaped, as seen in the photo above.
What i need to do now is to Planish the edges of the metal against the flat face of my Dishing stump.
Not only does this flatten out the steel, 
but it also lines up all of those nasty little burrs making them much easier to file off.

Next Stop on this Doomed Train to NYC ComicCon 2010, I will be playing with my new 6" Buffing wheel!

Thursday, July 29, 2010

Full Cardboard arms- complete with attached Spaulders and lames

So, in my attempts to archive, i seem to have missed a post! so here goes:
Now that i have my arms (in cardboard) and shoulder cop (in steel) complete, its time to design the lames that will connect them together.
This was made ten times easier by diving head first, once again, into the armour archive.


 Until now, i didn't even realize, but this pattern was by Sinric too! All i needed was the basic pattern of the lame, but nevertheless! For a smoother look, i wanted the lames to get progressivly larger as they got closer to the shoulder cop. To complete this look, i traced the lame shown above onto cardboard and i used it as the bottom of the three lames. I then laid the cardboard pattern over top of a piece of parchment and traced a progressivly wider lame using the same basic shape of the first one. I repeated this process for the top lame.

Side View
I think it has a much smoother look to it. 
The traditional Spaulder has a very boxy look, but Dooms armour is always very rounded.

Back view

Front view
Please notice, the inner elbow is very much exposed. This is something i will handle when it comes time for assembly. My current solution is a piece of firm fabric riveted into place spanning from the top of the vambrace to the bottom or the rerebrace. I plan to sew horizontal lines to give it a "ribbed" look and also offer a little more movement. But well see, these things have a tendency to devolve very quickly.

Until next time Doomed True Believers! Excelsior!

Thursday, July 22, 2010

Arms- From Pattern to Steel


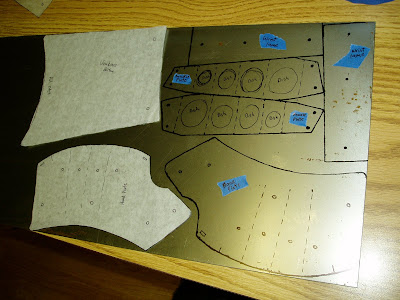
Not a whole lot of excitement here. No hammers, drills or shears. Only the patterns i printed off the armour archive, some parchment paper, black sharpies and painters tape (it doesn't rip the pattern when i remove it).


The full arms pattern was posted by Sinric and can be seen here.


The Fingered gauntlet pattern was posted by Thor Z, and can be seen here.

Now i have to do this for the legs, neck and Shoes.

This is more of a photo collage than it was a blog post, but pictures always speak louder than words.

Wednesday, July 21, 2010

Arming my arms- 3 (this is getting redundant)

Now its time to adjust the Rerebrace, or upper arm, so that it fits comfortably.


Shown above is a closeup of the current rerebrace top and bottom. If you remember from my earlier post, this was a temporary fix. All of the patterns i came across for full arms did not have a cover for the exposed side of the bicep. I used the pattern for the rerebrace and added a similar curve to the Vambrace bottom so that it will function similarly. Now the only issue is sizing!

Its just too large! That's what she said What? oh nothing.
 
Ahem, Moving along then. Shown above is my final pattern for the upper and lower rerebrace. Last time when i adjusted the overlapping material, i just cut off the excess. In this case, it was not that easy. Since the pattern my pattern was makeshift, i had to "recreate" the pattern in real life, instead of how things work in my mind. I untied the rerebrace from my cardboard arm and wrapped a large piece of parchment around it. I then traced around the edges of the correctly fitted cardboard mock up. The end result was one large piece of parchment. The used the width of the original pattern to decide where to separate the two pieces.

The end result is a nice clean fitted rerebrace! Now its time to get to work!


Friday, July 16, 2010

WHITNEY ROPER!

I know that i am getting a little ahead of myself by posting this (as i am extremely backlogged), But i just had to share this news!


I got my (semi)New Whitney Roper #5 Jr in the mail today!


Isn't she Beautiful! Ching Ching Sparkle Sparkle


The photo above shows a small piece of scrap 16 Gauge mild steel that i used to try it out on. It was so easy, it was like using a paper punch! for anyone who is not familiar with The Whitney roper #5 Jr, check out this link on the Armour Archive please ignore the Snarkey remark by "odd" in the beginning of the post.

Arming my Arms- 2 (sequels CAN be better than the originals)

Now that i have my cardboard arm up and running, its time to make all of the necessary adjustments to the patterns. The first, and easiest tweak was to scale back the length of the Vambrace, or forearm. Since Dooms Gauntlets have their own very large Vambraces, the ones connected to the full arm will not need to be very long at all.


The adjustment was very simple. First what i did was cut a few inches of length from the top and bottom halves of the vambrace, shown above.

Then, i put the demi-vambrace on my arm to see how it fit. This pattern is intended to be worn with a pair of gauntlets with very short wrist guards. Because of that the bottom hole was large enough to squeeze your fist through, but as it flared up towards the elbow it gets much larger in width. For what i need it for, this was much too wide as this will need to fit under another larger vambrace. So with the newly shortened demi vambrace on my forearm, i taped down the excess width until it fit comfortably. As i took it off i made sure that my fist would fit through the bottom hole. In black marker to traced where the cardboard overlapped itself. I then removed the tape and cut the excess material until the top and bottom fit without any overlapping. The Photo below shows where the overlapping occurs.


The end result was much more comfortable and practical. The next adjustment that needed to be made was to the Rerebrace, or upper arm. But ill save that for another post!